Live Lecture
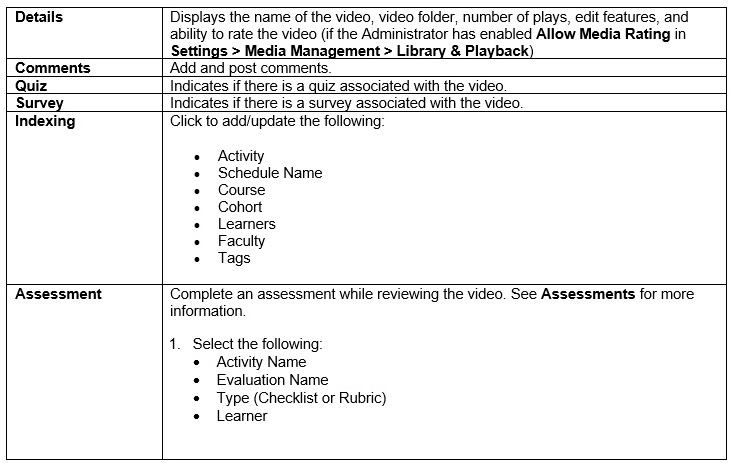
Schedule a Live Lecture(Administrator and Faculty only):
See Schedule Recordings for more information.
View Live Lectures

Click Live > Live Lecture to view live recordings in progress and those scheduled to stream live.
Live Streaming Features (Administrator and Faculty only)
Click Live > Live Lecture Streaming to view Scheduled Live Sessions for Today, Next 3, 7 or 30 Days, or for a specific date range. Click Refresh to update.

Note: Make video, audio, MIME, and text bookmarks on live video.
Pan-tilt-zoom (PTZ) is avilable on live video playback if enabled for the camera.
Live Streaming Video Tabs

PTZ (pan/tilt/zoom) camera capability
PTZ(pan/tilt/zoom) camera capability from the Live menu if enabled for the camera.

- Click Live > select a Saved View and then click the camera name.

2. Click the PTZ tab to access.
Live Meeting
Live Meeting Requirements
- You must purchase a Video Conference license. Contact EMS for more information.
- Your web server must have access to the Internet for video conferencing.
- Computers must have Internet access to start a video conference.
- Computers must have a web cam and a microphone enabled.
Schedule a Live Meeting (Administrator and Faculty only):
See Schedule Recordings for more information.
View Live Meeting

- Click Live > Live Meeting to view scheduled video conference meetings. Note: Live Meetings only appear here for the Duration indicated when the meeting was scheduled.
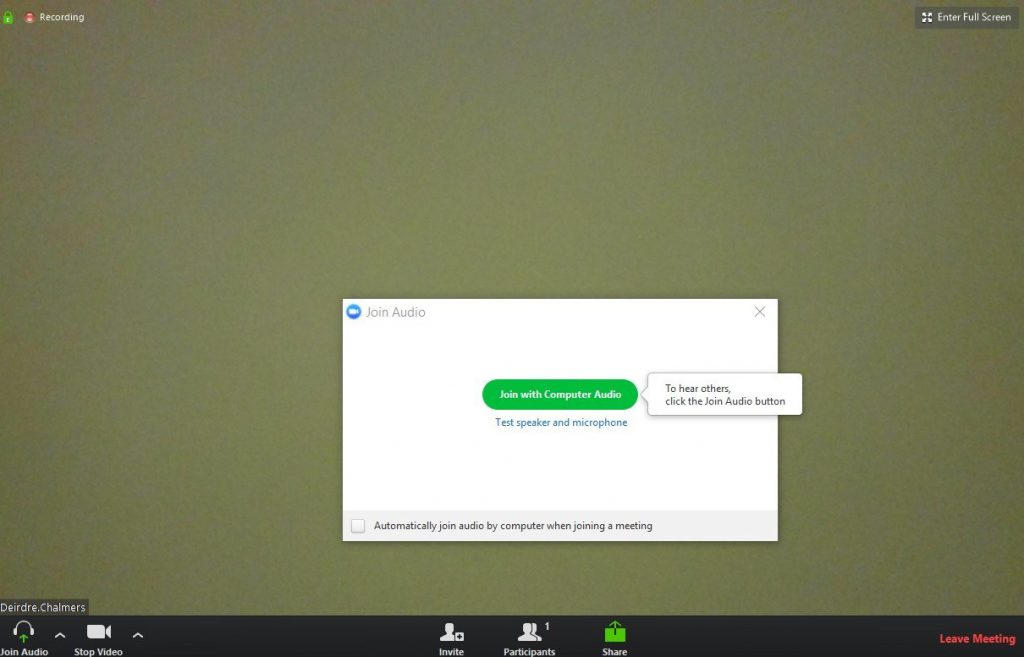
- Click the meeting and then follow the directions on the screen to launch the video conference.

3. Join with computer audio to hear others in the conference.
4. Click the arrow next to Join Audio to test microphone and speakers and adjust audio settings as needed.
5. Click Manage Participants to see how many people have joined the meeting and to manage audio for participants.
6. Click Invite to add participants to the meeting: either click Copy URL or Copy Invitation to cut & paste the link and meeting ID into your email.
7. Click Share to select the window or application that you want to share and then click Share. Note: Click Advanced for advance sharing features:
- Portion of Screen: Share a portion of your screen by using a resizable window.
- Computer Sound Only: Share audio from your computer without sharing your screen.
- Content from 2nd camera: Share content from a second camera.
8. Click Pause/Stop Recording to pause resume recording or stop recording.
9. Click Leave Meeting to assign a Host if want to keep the meeting running.
10. Click End Meeting to end the meeting for all participants.
Add Online Meeting (Administrator and Faculty only)
Create an Online Meeting using video conferencing.
Video Conferencing Requirements
You must obtain a Video Conference license. Contact EMS for more information.
- Communication must be enabled between MEDIASHARE and the video conferencing system:
- MEDIASHARE must be a publicly accessible site
OR
- If MEDIASHARE is only accessible on campus or by VPN, EMS will ask you to work with your IT department to ensure that the required access is enabled:
- The MEDIASHARE web server has access to the Internet.
- The MEDIASHARE web server can be accessed externally.
- Computers must have Internet access to start a video conference.
- Computers must have a web cam and a microphone enabled.
- Google Chrome is the recommended browser on all devices.
- Turn off pop-up blockers

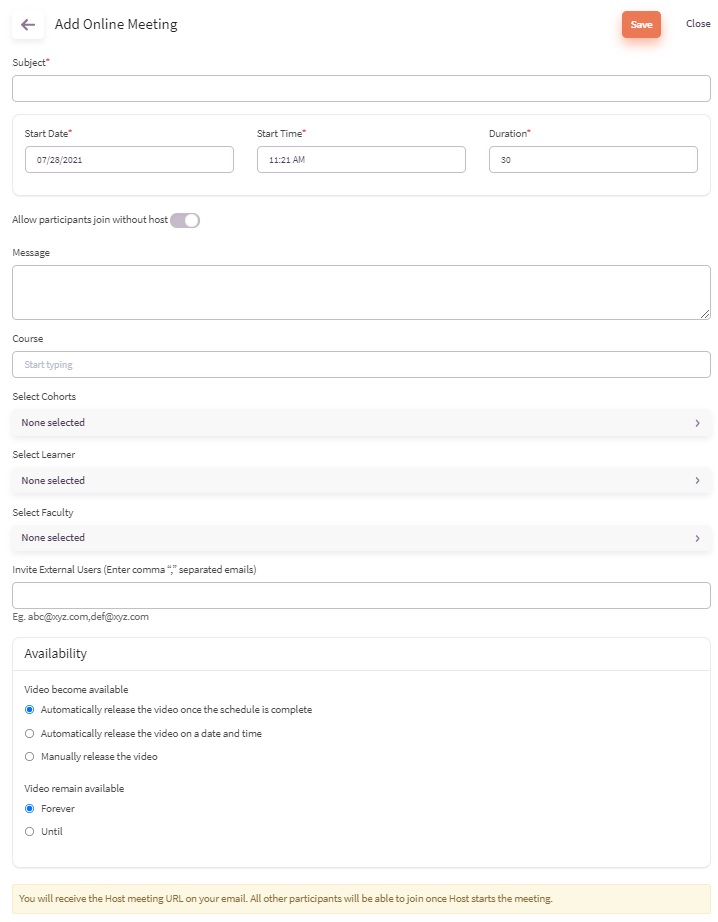
- Click Live > Live Streaming > Add Online Meeting.
- Complete the required fields.
- Invite External Users by adding email addresses separated by a comma.
Join Online Meeting
- Computers must have Internet access to start a video conference.
- Computers must have a web cam and a microphone enabled.
- Google Chrome is the recommended browser on all devices.
- Turn off pop-up blockers.
- Install the Zoom App from the Apple or Google Play store on a mobile device BEFORE clicking Start Video Conference.
Host will receive the Host Meeting URL email.
All Participants will be able to join the Online Meeting by clicking Live > Live Streaming > Join. A count-down timer appears until the start of the meeting.
Add Webinar

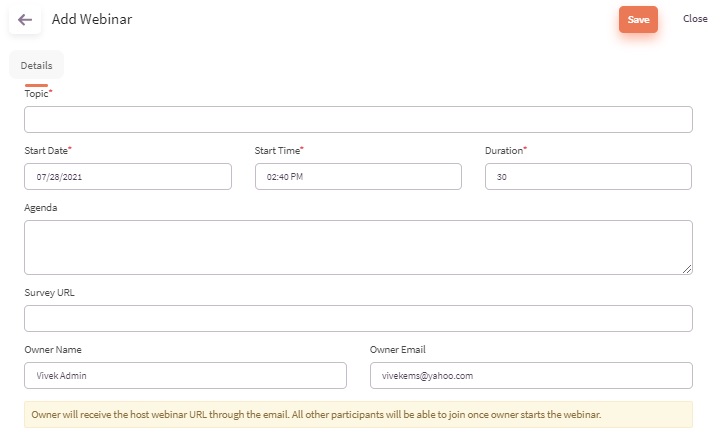
- Click Live > Add Webinar.
- Complete the required fields and then click Save.
Join Webinar
- Computers must have Internet access to start a video conference.
- Computers must have a web cam and a microphone enabled.
- Google Chrome is the recommended browser on all devices.
- Turn off pop-up blockers.
- Install the Zoom App from the Apple or Google Play store on a mobile device BEFORE clicking Start Video Conference.
Host will receive the Host Webinar URL email. IMPORTANT! Attendees cannot join until you click Broadcast.
All Participants will be able to join the Webinar by clicking Live > Live Streaming > Join. A count-down timer appears until the start of the webinar.
